
How to improve the sound quality of your content
When it comes to video content, audiences will often forgive imperfect visuals, but poor audio is actually far less tolerable. Distorted dialogue, reverberating rooms, and unbalanced speech and music can instantly reduce the perceived quality of your work. And as a creator, you don’t want to give a viewer a reason to click away. So, whatever type of content you’re creating, don’t underestimate the importance of audio.
Here are some practical ways to improve the sound quality of your video content, from recording through to final mix.
Use a good microphone

The microphone you use will have the single biggest impact on audio quality. Using the built-in camera or laptop microphone is not advisable as they tend to pick up room noise and lack clarity. This ultimately leads to a result that feels less polished and professional.
Instead, consider using one of the following:
- A USB condenser microphone: Best for desk-based recording
- A shotgun mic for on-camera dialogue: great for picking up sound at a distance.
- A lavalier (lapel) mic : Ideal for talking-head or mobile shoots
Just as important as the mic itself is its placement. Keep the microphone as close to the sound source as possible while avoiding catching it on camera (unless the mic is an aesthetic feature of the shot). A well-placed affordable microphone will often sound better than an expensive mic used incorrectly. You should spend as much time and effort considering the sound recording of your content as the visual aspects.
Consider the acoustics of your recording environment
A microphone is only ever as good as the room or space it’s in. Hard surfaces like bare walls, windows, and ceilings create reflection as the sound waves bounce off them. These reflections are what cause echo and reverb. Unlike sung vocals that rely heavily on reverb most broadcast recording aims to be as dry as possible.
For this reason, most professional studio’s will be treated to improve this, but the chances are you’re not filming/recording in a professional facility. The following simple steps can help to improve the acoustics and deaden a space.
- Aim to record in a smaller, carpeted room. Often the more cluttered the room, i.e book shelves, the better as there are less flat surfaces to bounce off.
- Add soft furnishings such as curtains, cushions, or rugs
- Use acoustic foam or portable sound panels
- Turn off any noisy appliances like fans or air conditioning. Shut windows if it’s noisy outside.
For more detail on room treatment check out this blog.
Re-Dubbing and AI Lip Sync
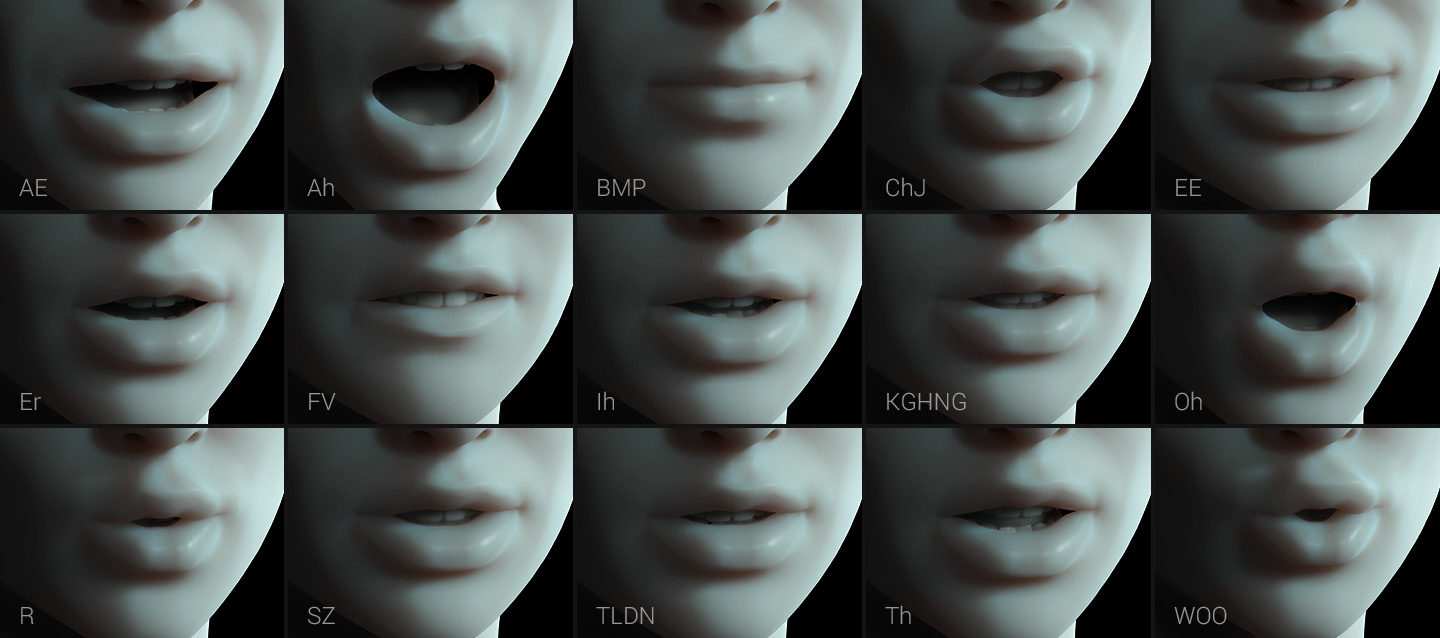
If your raw audio is poor, perhaps due to wind or background noise, distortions, or an extremely poor recording environment—re-dubbing may be your best option. This involves re recording the speech in a controlled well treated environment and carefully syncing it to the footage. This used to be a highly skilled task performed by hand, but modern AI tools have made this much easier.
AI-powered lip-sync software can now match newly recorded dialogue to your existing footage with impressive accuracy. Remember , the closer you can re record the audio to the original, the smoother the result will be due to the AI tool not having to do as much work. We suggest playing smaller sections of the original audio and re recording it in bite size chunks. Then using a digital audio workstation (DAW) try to line up the new recording along side the original recording. You could even use audio warping tools to get them to line up even more accurately.
Using this technique allows creators to salvage visually strong content while dramatically improving audio quality. Just remember, overdubbing like this is how a lot of scenes in big motion pictures are done.
Use AI tools that clean up sound (i.e.Adobe Podcast)
There are now numerous AI audio enhancement tools available for content creators. The launch of Adobe Podcast, with its Enhance Speech feature, has been one of the biggest game changers. It has the ability to reduce background noise, improve clarity, and even make recordings sound like they were captured in a professional studio. And while the results are often astoundingly good, there are some negative audiable artifacts. It is therefore often best to use this tool with discretion. Luckily it features a balance slider control between the processed and unprocessed audio. The sweet spot is usually somewhere in the middle where the background noise or reverb is lowered considerably but it doesn’t sound too artificial.
And while tools such as Adobe Podcast shouldn’t replace good recording practices, they are excellent for polishing dialogue. this is especially the case for creators working remotely or with limited equipment.
Use automation to balance your dialogue
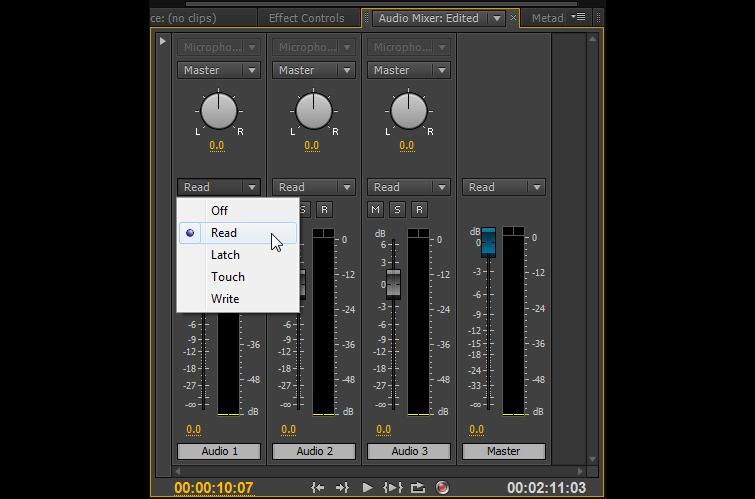
You may have a lovely clean and clear recording but it may not be nicely balanced and consistent. Viewers shouldn’t have to feel the need to adjust their volume constantly.
Most video and audio editing software allows you to use automation, which lets you dynamically adjust volume over time. This is particularly useful for:
- Reducing loud peaks
- Boosting quieter sections of speech
- Lowering music when dialogue is present
Usually the audio waveforms will give you a clue whether some sections are quieter than others. Use the waveform information as your initial guide but also, do not ignore your ear, especially if the content features different people speaking. This is because the frequency make up of different peoples voices affect the way we perceive volume.
It can also be tempting to use compression or limiting to balance the dialogue levels but this can be problamatic. This is because it can bring up any background noise, which is something you want to avoid.
Automation is the best technique to ensures a consistent listening experience, giving your content a professional finish.
Create a good music/dialogue balance
Music can add emotion, energy, and polish, but it must be used in a controlled and considered way. Getting the right audio mix between the music and the dialogue is crucial. Poorly balanced audio can quickly become distracting.
When mixing:
- Keep dialogue as the priority
- Ensure music sits comfortably underneath speech rather than overpowering it
- To give the music more presence subtly boost it during periods without dialogue.
- Use sound effects sparingly and intentionally
A good rule of thumb is that if the audience notices the music instead of the message, it’s too loud.
Avoid music that competes with speech
Choosing the right music to compliment your content is crucial and should be done in a considered way. Tracks with prominent vocals, aggressive frequencies, or busy melodies, can clash with speech and reduce overall clarity.
As a rule it is good practice to choose music that:
- Is instrumental (if used under dialogue)
- Has a steady, unobtrusive rhythm
- Leaves space in the mid-range where speech lives. Brash sax solo’s should be avoided!
Using high-quality, royalty-free production music designed for media use makes finding and selecting the right audio much easier. Libraries like RouteNote Licensing offer affordable access to music and sound effects specifically created to support content rather than distract from it.
With subscriptions starting at just $4.99pm for unlimited use, it’s a cost-effective way to elevate your sound rather than worrying about sourcing and copyright issues.